How to Self-Host a Home Server: A Practical Beginner’s Guide
Even though modern cloud server hosting solutions are sophisticated, powerful, and reliable, they still cannot be fully trusted, nor are they the only solution one can implement in their product. Outages, such as the one that occurred in October 20th on AWS, can potentially render several thousand different products offline or unstable, resulting in millions of dollars in losses. Self-hosting was the main solution up until a few years ago, and it is still a very powerful and capable way of hosting web products.
Through self-hosting, you can exert full control over the server and the application, allowing it to operate in a much more private and sometimes even more trustworthy environment than when using an external cloud. To accomplish this, you only need an old computer, knowledge of Linux, an empty flash drive, and dedication. Now, let’s understand a bit more about the basics of cloud and how to host your own solutions!
Why Self-Host Your Own Server?
There are several different reasons to understand why self-hosting virtual servers, web servers, etc, might be the right choice for many use cases. With it, you can, first of all, have full control over your data, where it’s stored, even to the physical level, and can even decide where it’s best to dedicate more RAM and CPU, etc. For a developer, that’s immensely valuable knowledge, as it will lead you to understand a lot more about how computers, servers, systems, etc, work, and even how other cloud solutions work as well.
Additionally, one of the primary uses of self-hosting is to have a personal set of tooling, including productivity, storage, automation, and even local video and audio streaming, among other benefits. Tools such as Plex, Nextcloud, and PiHole have become increasingly popular and stable in recent years, sometimes even being used in production environments. Additionally, as self-hosting becomes more popular, developers create more tools and add-ons for existing tools, making the environment more versatile and complete, while also making the lives of those who use it easier.
Finally, hosting servers locally is, most of the time, cheaper than entrusting this responsibility to external cloud providers. Even though it might be more complex to configure and maintain, and not as automated, sometimes the price difference still pays off, as it only requires an internet connection, electricity, and an old machine to run. With it, if you have a small set of services to host or, conversely, envision running several different services for your customers, then it will surely be a more cost-effective solution, resulting in almost no additional costs for you. Therefore, due to all of this, the path to creating a home server is a highly profitable, stable, and trustworthy one, and it can accommodate a wide range of use cases, both for business and home use.
What You’ll Need Before Starting
There are some basic prerequisites for starting your home lab. Some of them are more or less optional, but some aren’t: for instance, you simply can’t do it if you don’t have a spare computer to use as the server. So, without further ado, here is the simple list of things you must own and know beforehand:
- Owning a spare machine: First of all, you need a dedicated machine to host your home server. It can be an old computer (even a 10 or 15-year-old computer is still good for most applications), or some other type of small computer, such as a Raspberry Pi. Any kind of modern desktop or notebook will do the job, and any RAM technology from DDR3 onwards is already fine.
- Having a stable internet connection: That’s also a pretty straightforward requirement: if your internet connection goes down, then your whole server will also go down, most of all if you want to use it for external connections. If, on the other hand, you want your server to work only locally, then it will be fine, as the datapoints will connect via intranet, using the cables and your local network.
- Owning a flash drive that can be formatted: You will need a flash drive to install an operating system ISO, such as Ubuntu Server or Proxmox, and to do so, you will necessarily have to format it. So this flash drive will be used to install your server’s OS, and you need one that can be formatted, and also it needs to have at least 8Gb of available space.
- Basic Linux terminal knowledge: Most of the things you need to configure are on a pure Linux terminal (or Windows if you decide to use it), and so you must at the very least know how to handle the terminal and the basic commands. You don’t necessarily need to know how to configure everything by heart, but you must at least understand what you’re doing and which commands to use or not use.
And, of course, you must have a bit of determination and enjoy configuring your systems, like to configure environments by hand, and be curious about making it work as well as possible. It won’t be easy at the beginning, as you may still be unfamiliar with the finer details of configuring a server. However, the process will teach you a great deal about computers, servers, services, and how the Internet works. It will be a journey of intense learning, and, if everything turns out just right, there will also be profit at the end of the day.
Choosing the Right Operating System
A crucial step in configuring your home server is determining which operating system to install. There are several different available options, and surely every table distribution will do the job, but you must search and determine which one will fit your use case best. So, to help you in this step of the process, here’s a list of the four most used options:
Ubuntu Server
Arguably the best option available, Ubuntu Server is very trustworthy, stable, and overall a very complete solution for any type of server. Currently, most of the internet’s websites likely run on an Ubuntu server, which is extremely popular due to its free Linux distribution, a huge user base that keeps it up-to-date with security and modern software, and other factors. It is also a very light distribution, ensuring any machine will be able to handle it, and it works very well alongside Docker or other containerization tools, making the scaffolding of your server a pretty straightforward process.
Debian
Debian is an even lighter version of Ubuntu, ideal for older machines, though it is also very trustworthy and complete. Ubuntu is actually built on top of Debian, and, even though the former is more complete due to having a bigger user base, the latter is still very stable, has great support across platforms, and can easily run most modern software. Still, it is also a more “raw” distribution, and you probably will have to take a few more steps to configure everything for your server to run.
Proxmox
Proxmox is a bit of a different solution for virtual private server hosting. It isn’t directly a server distribution: it is a type 1 hypervisor, installed directly into the bare-metal machine, which means that it allows for much more efficient virtual machines, greater stability, and less overhead to configure each VM. So, it isn’t directly a server: it allows you to create several different VMs that will actually run the servers, and each of them will run operating systems of their own, such as Ubuntu.
It is great when you need to configure multiple servers and actually need them to run in their own environment. For instance, you might have a big client portfolio or want to organize your servers into different VMs to differentiate personal and professional projects, etc. It also grants the many benefits of using a hypervisor, such as facilitating backups and scaffolding of new servers based on pre-existing ones, making it an even safer option to host your servers, as they’re entirely separated into VMs. Due to all of this, it is surely the best solution for VPS server hosting on bare-metal machines.
Windows Server
Though it is not at all the best option for a home server, as it isn’t free open-source software, sometimes Windows will still be good if you need to self-host, as you may require more robust corporate software. It is already known for its reliability and several different features to allow easier corporate management, with Active Directory, integration with Office and Azure applications, BitLocker, Windows Defender, etc. It will probably be a good choice if you want to host a server for a company, given that you’re willing to pay for the licenses for Windows server hosting.
Each option has its ups and downs, and it’s up to you to understand which will be the best option for you. Still, if you’re confused and don’t know which one to choose, then probably Ubuntu Server will be the best for you, as it’s a kind of one-size-fits-all solution. It is stable, trustworthy, and we know beforehand that everything you might need is already supported, due to its huge and very dedicated community and environment.
Setting Up Your Server Step-by-Step
As fast and well optimized as the setup process is nowadays, it will never be 100% easy the first few times. But you get the hang of it very quickly, and soon you’ll be comfortable when configuring your server. Also, as the device and the servers are entirely yours, you can always restart, reset everything, install another server distribution, until you get everything right. So, now, here’s a quick step-by-step guide on how to actually start your server:
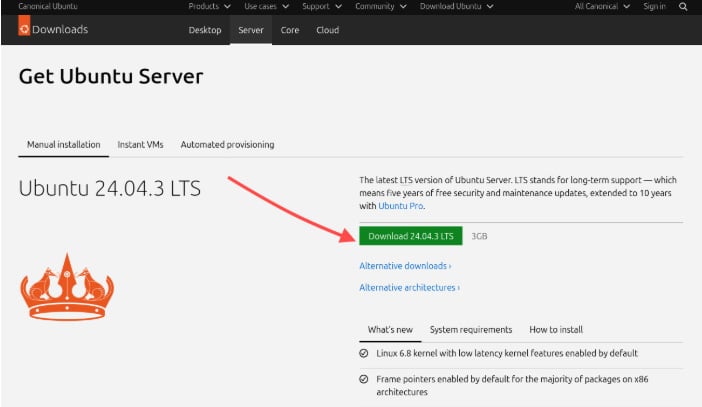
- Download your operating system ISO: Once you’ve decided which operating system fits your use case best, it’s time to download it. For instance, here’s the Ubuntu download page:
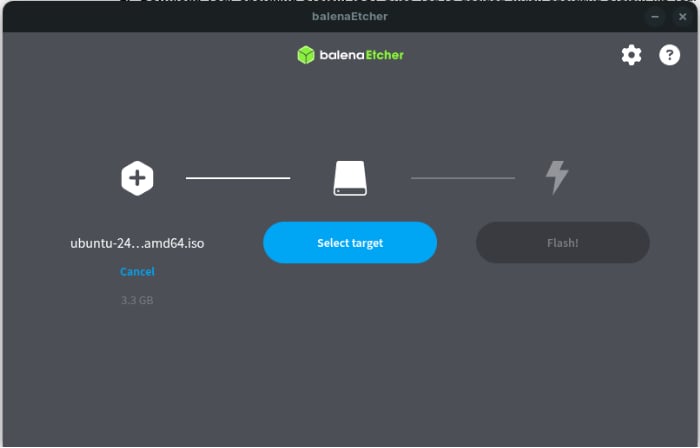
- Create your bootable flash drive: To do so, you must install Balena Etcher or Ventoy, or some other program to install the ISO into your drive. They’re by far the most popular solutions available: currently, Balena is easier to install, while Ventoy is easier to use after the first installation. For this example, we’re using the former. You start the software, select your ISO, select your drive, and click “Flash!”. It will ask you to confirm before formatting your flash drive, as, once it’s started, there’s no coming back:
- Format your computer and install your new OS: This step is a bit complicated and requires a tutorial all for himself, and we’re not going to enter into details, so here’s a quick tour on how to do it:
-
-
- Connect your bootable device to your computer
- Discover the key you must press to enter your BIOS: Usually, to find it out, you must search Google for your computer model. Still, usually, it’s F2, F3, or F10.
- Restart your computer and enter your BIOS
- Change your machine’s startup device to your flash drive
- Wipe out your main disk and install your new OS into it
- Remove your bootable device
- Restart your computer and log in to your new server
- Install essential programs: You must install some programs, such as Node.js, Docker, htop, etc. Also, you might want to configure SSH to be able to remotely access your server, with no need to directly access it to use it. This way, you don’t need to use a monitor, keyboard, and mouse, which will save a lot on energy costs.
- Run a service on it: Now, it’s time to actually run a service on your new server! And, in case you don’t have anything in mind, here’s a quick guide for backend web server to host made with ExpressJS and Docker, that will remain always up after a restart, and log your network address to facilitate communication from other devices:
-
a. ./src/main.js:
import express from "express";

import { networkInterfaces } from "os";

const app = express();

const PORT = process.env.PORT || 3000;

app.get("/hello-world", (req, res) => {

   res.send("Whats up");

});

function getNetworkIP() {

   const nets = networkInterfaces();

   for (const name of Object.keys(nets)) {

       const netInterfaces = nets[name];

       if (!netInterfaces) continue;

       for (const net of netInterfaces) {

           if (net.family === "IPv4" && !net.internal) {

               return net.address;

           }

       }

   }

   return "localhost";

}

app.listen(PORT, () => {

   const networkIP = getNetworkIP();

   console.log(`Servidor rodando em http://${networkIP}:${PORT}`);

});
b. Dockerfile:
# Use Node.js LTS version

FROM node:20-alpine

# Define o diretório de trabalho

WORKDIR /app

# Copia os arquivos de dependências

COPY package*.json ./

# Instala as dependências

RUN npm install

# Copia o restante do código

COPY . .

# Compila o TypeScript

RUN npm run build

# Expõe a porta do servidor

EXPOSE 3000

# Comando para iniciar o servidor

CMD ["npm", "start"]
c. docker-compose.yml:
version: '3.8'

services:

 backend:

   build: .

   container_name: backend-server

   ports:

     - "3000:3000"

   restart: always

   environment:

     - PORT=3000
d. package.json:
{

 "name": "template-backend",

 "version": "1.0.0",

 "description": "Simple backend server example",

 "type": "module",

 "main": "src/main.js",

 "scripts": {

   "dev": "nodemon src/main.js",

   "start": "node src/main.js"

 },

 "keywords": [],

 "author": "",

 "license": "ISC",

 "dependencies": {

   "express": "^4.18.1"

 },

 "devDependencies": {

   "@types/express": "^4.17.17",

   "@types/node": "^20.10.0",

   "nodemon": "^3.1.9",

   "typescript": "^5.3.3"

 }

}
With these four files, you’re all set to start a simple Node service and get started with virtual server hosting! If you’d like professional support for monitoring and maintaining your server over the long term, managed IT services can help ensure your services stay up and performant.
Performance Tips for Old Hardware
A great deal of this article has focused on using spare computers, old machinery, etc. And now here are some tips on how to get the most out of these old computers, making their lifespan longer and also ensuring that to use their maximum processing capacity:
- Install an SSD: The difference an SSD can make in an old machine that still runs an HDD is no short of magical. It can make the whole device run much faster and more reliably, becoming as quick and responsive as it was when it was new, and sometimes even more. That’s because the SSD can read and write into storage orders of magnitude faster than an HDD, and that makes the whole computer way faster as well.
- Run Debian Server: As cited previously, Debian Server is an even lighter and faster Linux distribution, the perfect use case for server hosting on older machines. As servers don’t have a graphical interface, they usually are way less processing-demanding than your usual desktop OS, so running a server is already way more friendly on your CPU, but you can still extract as much juice as possible from your PC.
- Don’t run many software programs simultaneously: Older machines usually don’t have that much RAM available, and they definitely run with slower clock rates and in older technologies. All of this leads to old computers having fewer usable spaces available for program execution, and, to avoid freezing and slowness, you should not run that many programs at the same time. It will make your whole server become slower, and with this, your systems won’t respond as well, leading to higher latency, and sometimes it will just stop working completely.
- Monitor your resource consumption with htop: To complement everything we have stated, htop is a lightweight and very simple tool to monitor all your resources (that is, CPU, RAM memory, input/output, download/upload, etc). It is very simple to install and use it, and to assist you with that, here’s a quick guide for Debian-based distributions (that is, Debian, Ubuntu, etc):
First of all, open your terminal, update, and upgrade your system’s dependencies and libraries:
sudo apt update

sudo apt upgrade
Then, install htop with:
sudo apt install -y htopAnd run it by simply typing htop into your terminal
htopIt will look something like that:
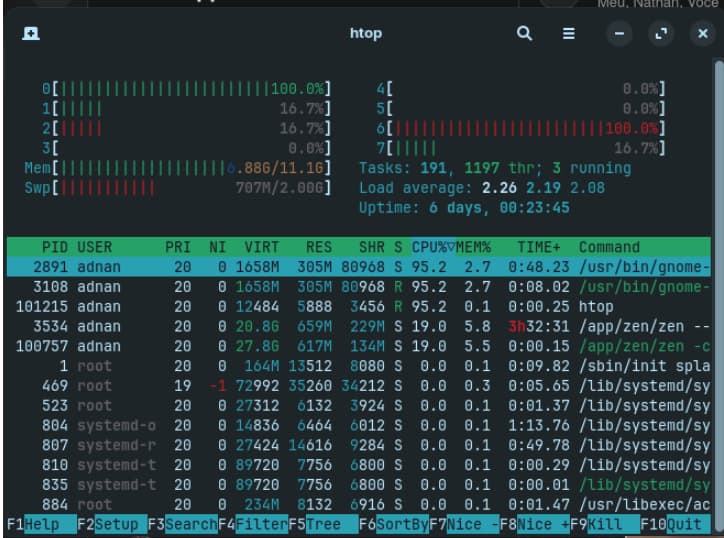
As you can see, the top part displays your CPU’s cores, then your RAM memory, Swap memory, your tasks, uptime, etc, and then your running processes. It’s also got some nice keyboard shortcuts at the bottom: for instance, F3 searches for a specific process and then sorts it out from the rest; F4 filters all your processes by name, F9 allows you to terminate a process instantly, etc. It’s a very useful tool for managing your computer, most of all when it freezes, as it will allow you to terminate the process that’s draining your system the most.
With it, you will potentially extend your machine’s lifespan by a few more years, and sometimes even make it more powerful than it ever was. The difference that an SSD can make in an old computer, for instance, is light-and-day: a slow PC that always freezes and bugs can become blazing fast and feel brand-new just by installing a solid state drive. Also, choosing the right distro is crucial to make the most out of your available RAM, as a lighter system will require less memory to run, which leaves more space for your software programs.
Conclusion
With all of this, we hope to have explained how hosting servers locally is still a very legitimate alternative to provide for your applications, whether they’re meant for home usage or to run a production environment. Actually, not so long ago, all websites were hosted on home servers or in a university’s computer; though it is now somewhat out of fashion to do this, you must think that cloud server solutions are actually a new thing. Before AWS, there was a machine running processes in a more or less handcrafted server, and, even though it has now gone out of fashion, the rest of the environment is even more advanced, automated, and modern overall.
Additionally, starting is way simpler than it might seem. You only need a spare computer, a stable internet connection, and a bit of dedication, and, quite honestly, you must enjoy fiddling with terminals, CLIs, and the such. Though configuring a home server is a simplified process nowadays, the first few times will never be easy and quick to do, as you will have to deal with a lot of configs you don’t use in everyday computer use. But you get the hang of it very fast, and in no time your server will be running at full sail to provide for your home lab, production website, to handle your clients’ portfolio, and many more. Start exploring basic services and go further as you feel more comfortable, and put that old machine you have lying around to good use! For readers looking to take automation and deployment to the next level, DevOps services and solutions can help you set up reliable, scalable workflows for your server projects.
FAQ
- Is it safe to self-host a server at home? Yes, it is very safe to self-host a server at home! Most of all, if you take the required measures for safety. You must, for instance, make sure your superuser isn’t accessible that easily, and that the default user doesn’t have root privileges. And, if everything is well done and configured, there are basically no dangers at all when hosting a virtual private server. On the contrary, sometimes it is safer than using ready-made cloud solutions, as your data is safely stored with you, and all your configs and systems actually do belong to you.
- How much does it cost to self-host? Assuming that you already have a spare computer to use as your home server, then the cost to self-host is very low. Even though computers can sometimes consume a significant amount of energy to function, when they’re set up to work as a server, their consumption tends to be relatively low, as they typically operate at only around 10% of their capacity. Also, depending on your ISP, you might need to pay extra for a static IP address, though it usually doesn’t cost that much; so, overall, usually self-hosting your servers is much cheaper than paying for a cloud server provider.
- Do I need a fast internet connection? Though it is not needed to have a blazing-fast internet connection, it is important that it is as fast as possible. Slower internet connections will lead to high latency times, ultimately leading to user dissatisfaction and frustration. Many studies explain that every single millisecond in loading time counts for keeping your users on your website; so, every megabyte of internet download/upload time counts. But you must bear in mind that, very frequently, not even your machine can handle ultra-high internet speeds, most of all if it gets to the gigabits per second level.
- Can I use a Raspberry Pi instead of a full computer? Yes, of course! Arguably, a Raspberry Pi, especially if it is 4th generation or the latest, is the best option for a home server. Many enthusiasts use it for their self-hosted servers and to run production code, and it is the most cost-effective solution that can give you amazing processing power with very little energy consumption. So, if you have one lying around, give it a go!